Time in the Trees
Welcome to the first blog post on my new website! For this first post, I want to share with you a very fulfilling creative-time endeavor I’ve been enjoying.
Covid has been hard on everyone; it has changed our lives drastically—certainly has mine! I am by nature, a people person and I chose my profession as a hairstylist well. For over two years now, I have only seen my husband, except for a few visits from friends for garden tours, outside and masked. I had to give up doing friends’ hair when Covid hit, due to my autoimmune disease. The only way for me to stay sane is to stay busy. And I have. I have been in the garden creating the garden of my dreams and I have been making fabric Christmas trees.
Let me tell you how I came to know about the trees. When I lived in Maryland twenty years ago, a hair salon client gave a coworker of mine one as a Christmas gift. I could tell my coworker was not so impressed with it, seeing it as “country.” I, however, was mesmerized by it and found it so beautiful. I could see the labor of love it was. The client explained (and showed) how she made it, going so far as to unpin one of the little flaps of fabric. Inspired, I went out after the holidays and bought tree forms, straight pins and Christmas fabrics that were on sale. Then, I discovered, I never had the time to make any. Not wanting to give up on the idea, I brought all the materials with me when we moved here twenty years ago, then got busy going to Hollins University for seven years.
When Covid hit, I had all the materials on hand. It was time to make trees that first Covid winter! I had never cut up fabrics before. The process is a lot of labor but not hard.
Making these trees has given me the chance to explore a wide variety of options with a relatively small amount of materials and tools—a fun creative challenge! This process is calming and highly satisfying at the same time and while a large number of the trees I’ve made have been Christmas-themed—traditional red and green color ways)—I think these trees bring texture, color and life to home decor beyond holiday decorating, since any fabric (and even paper) can be used.

When I first started exploring this process, it was with the idea of holiday trees in mind after having seen that first tree given to my coworker.
Below is a brief glimpse of the process. Gathering the fabric and preparing it can take a bit of time, but the process itself is relatively simple.

The fabric flaps are 2” x 6” (5cm x 15cm). I learned how to use a rotary tool to cut them on a self-healing mat with a T-square that hooks to the edge of the mat. Once the strips are cut out, I iron the long edges in toward the center, then fold and press the entire length in half. This makes a folded piece (I call them flaps) that’s about 1” x 3” (3cm x 7cm). I start at the bottom of a Styrofoam cone and pin each top corner of the raw edge of the flap into the cone, making sure that it covers the form but doesn’t hang over the edge. Each piece overlaps the one before it and when I’ve gone around the cone, returning to the first pinned piece, I need to unpin it at one side to overlap it on the last piece. The next row I repeat the pinning, creating a brick-lay pattern over the row below it, making sure the pins of the row below do not show, and working around the form and making sure that the row is even. This gets harder as you go up the tree. I have had to undo several pinned pieces as when I get to the first one it does not match up level/evenly. I hold the tree up to eye level as I work to check if I am going too high or too low with the flaps. I also use the iron on a steam setting and press the fabric to the tree without touching the iron to the Styrofoam above as it will melt on your iron. This makes the flaps lie flat. I also use one straight pin inside the bottom of the flap to anchor it, and two pins at the top on each corner.
I use three to four different fabrics on each row. And darker fabrics at the bottom helps to visually weight the tree and lighter ones at the top. I also try not to put two similar fabrics side by side. On the traditional colored trees, I might do the first row in green colors, then the second in red colors and alternate all the way to the top. And I often use green or red solid colors on the bottom of the tree alternating with a print. Also it is good to repeat some of the fabrics in the bottom further up the tree.
I find the hardest part is the very top of the tree and how to cover it. I often cut down the fabric flap as it is too much bulk at the top. Either cut it just long enough to cover the top edge, cut the inside flap two thirds off and pin to the outside edge of the tree, leave one flap and fold over the top to cover the 1/2” (13mm) of Styrofoam, or cut out a little circle of fabric to cover the top and pin it. Different forms present different difficulties as some are flat on top and some very pointed.
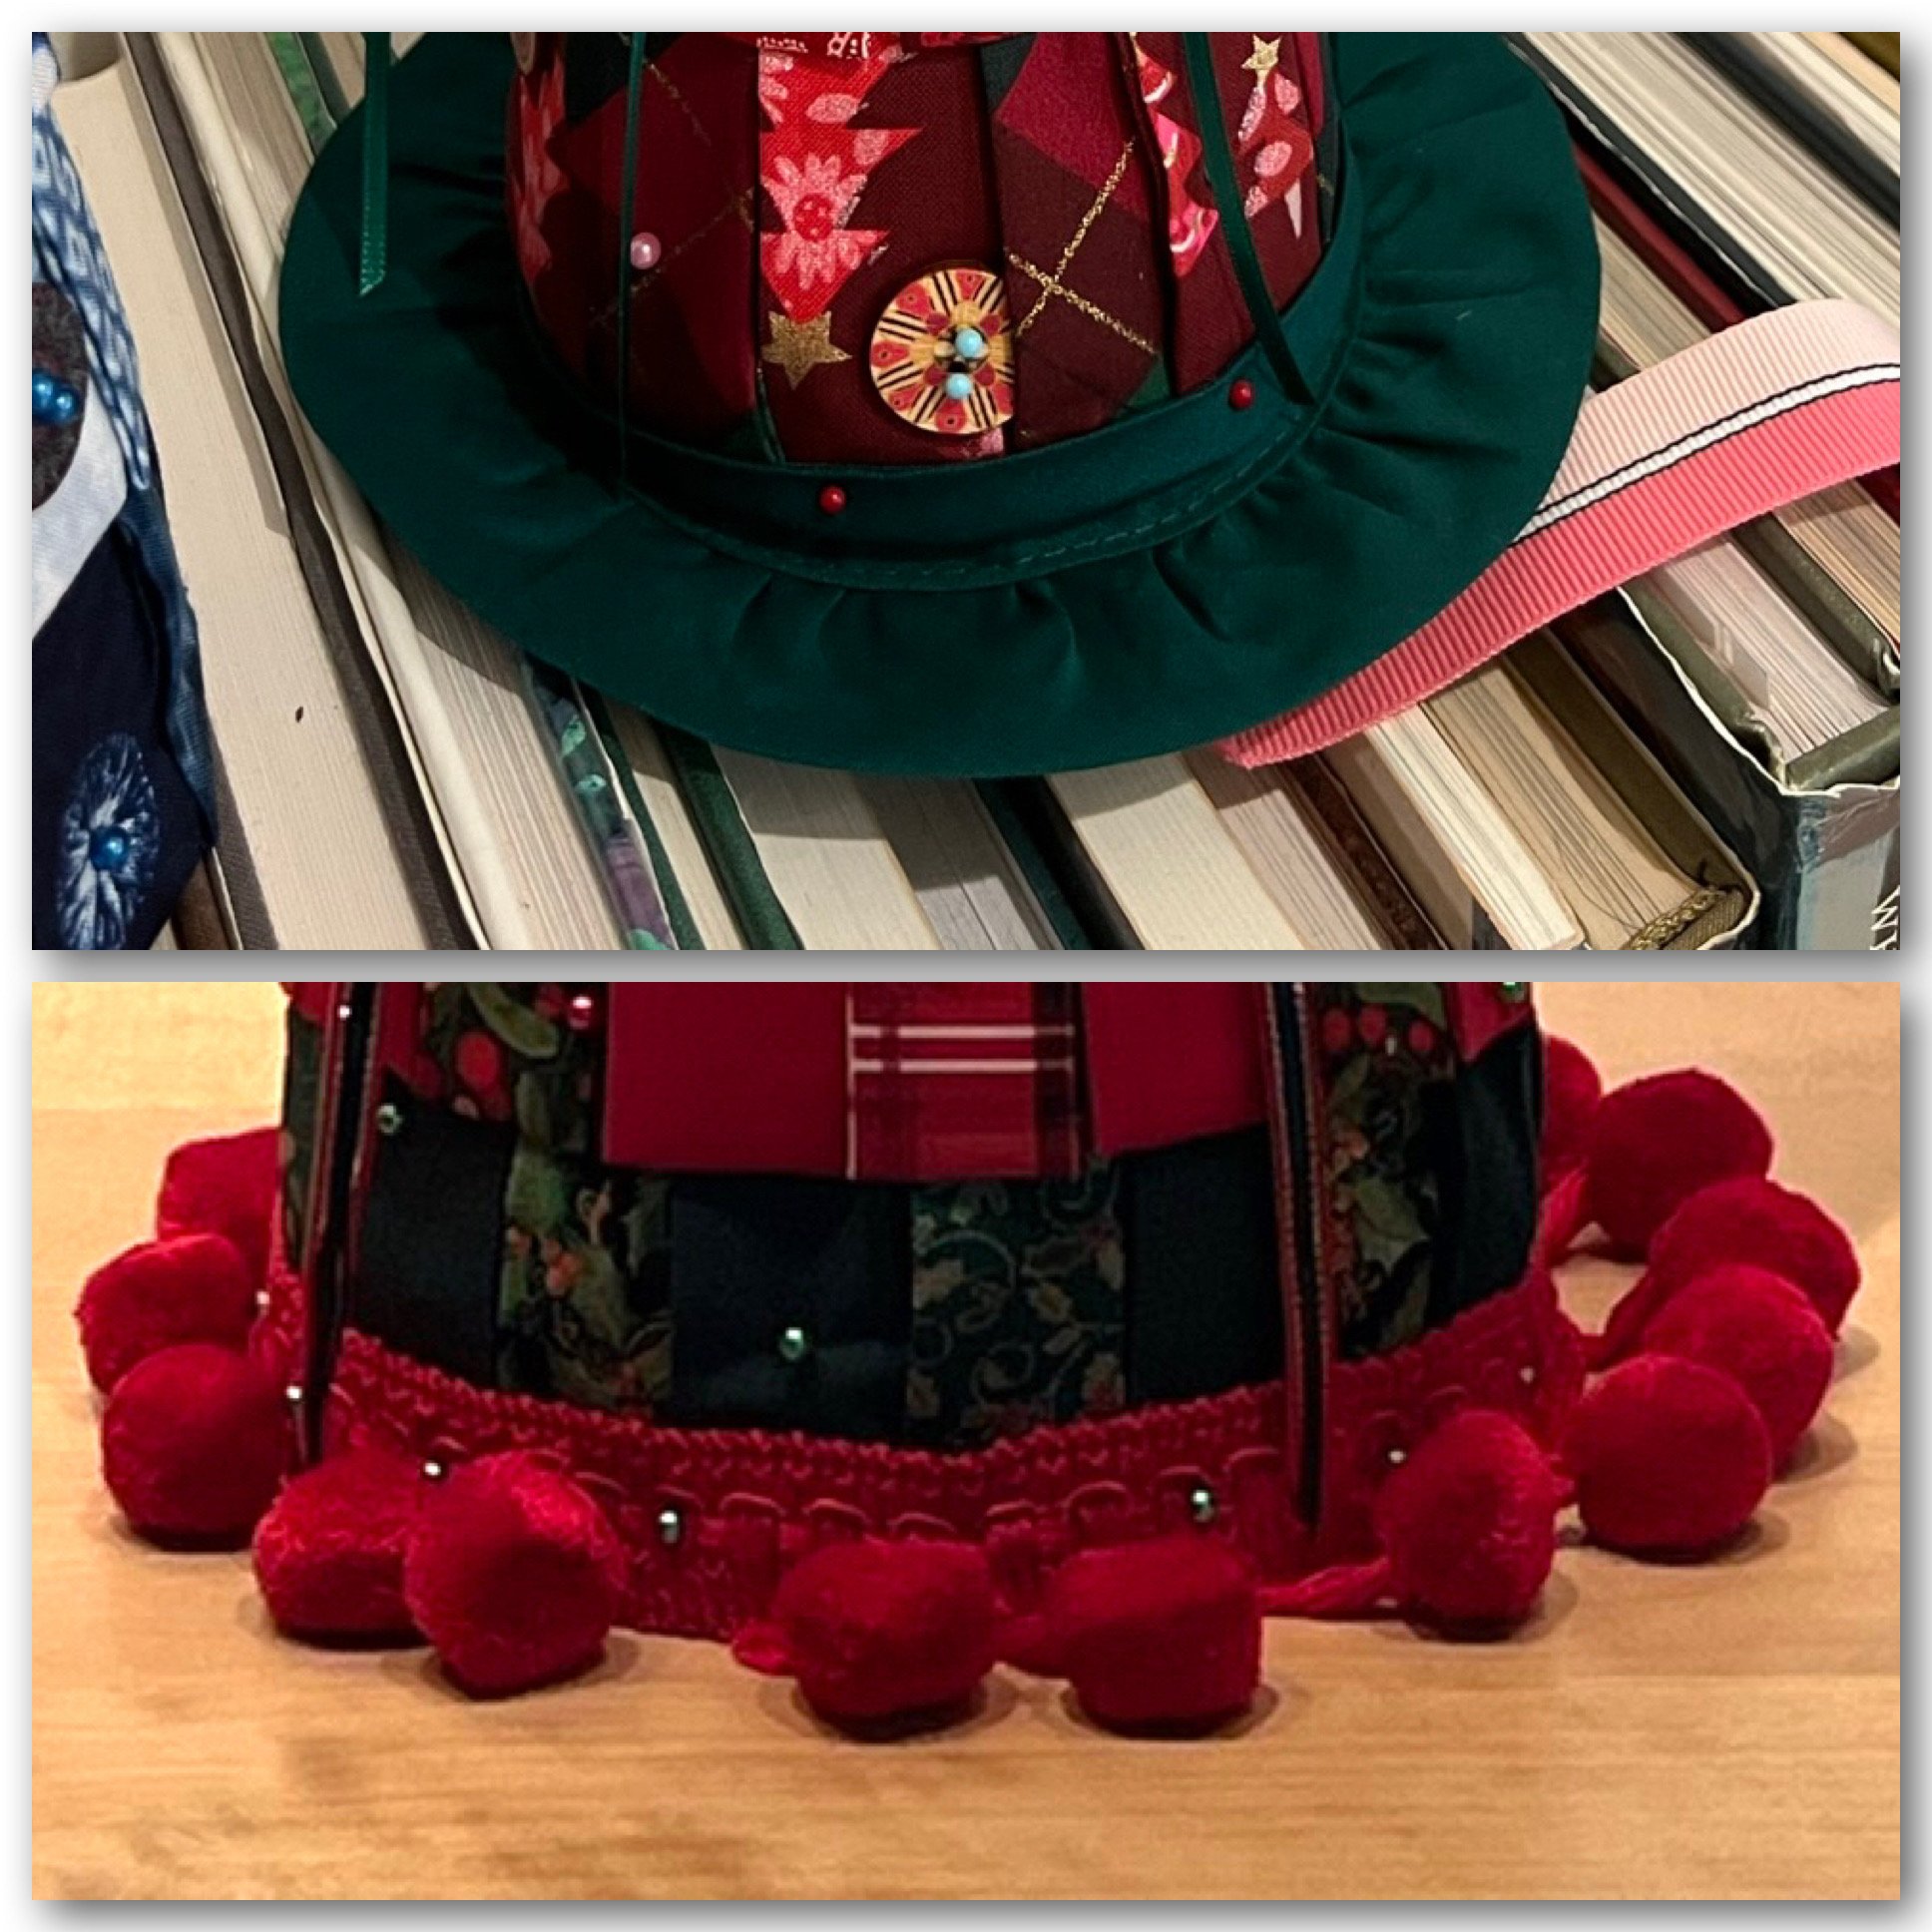
Next, I attach a ribbon to the bottom lip of the tree and often it is a pom-pom ribbon or a folded type of ribbon that spreads out on the table.
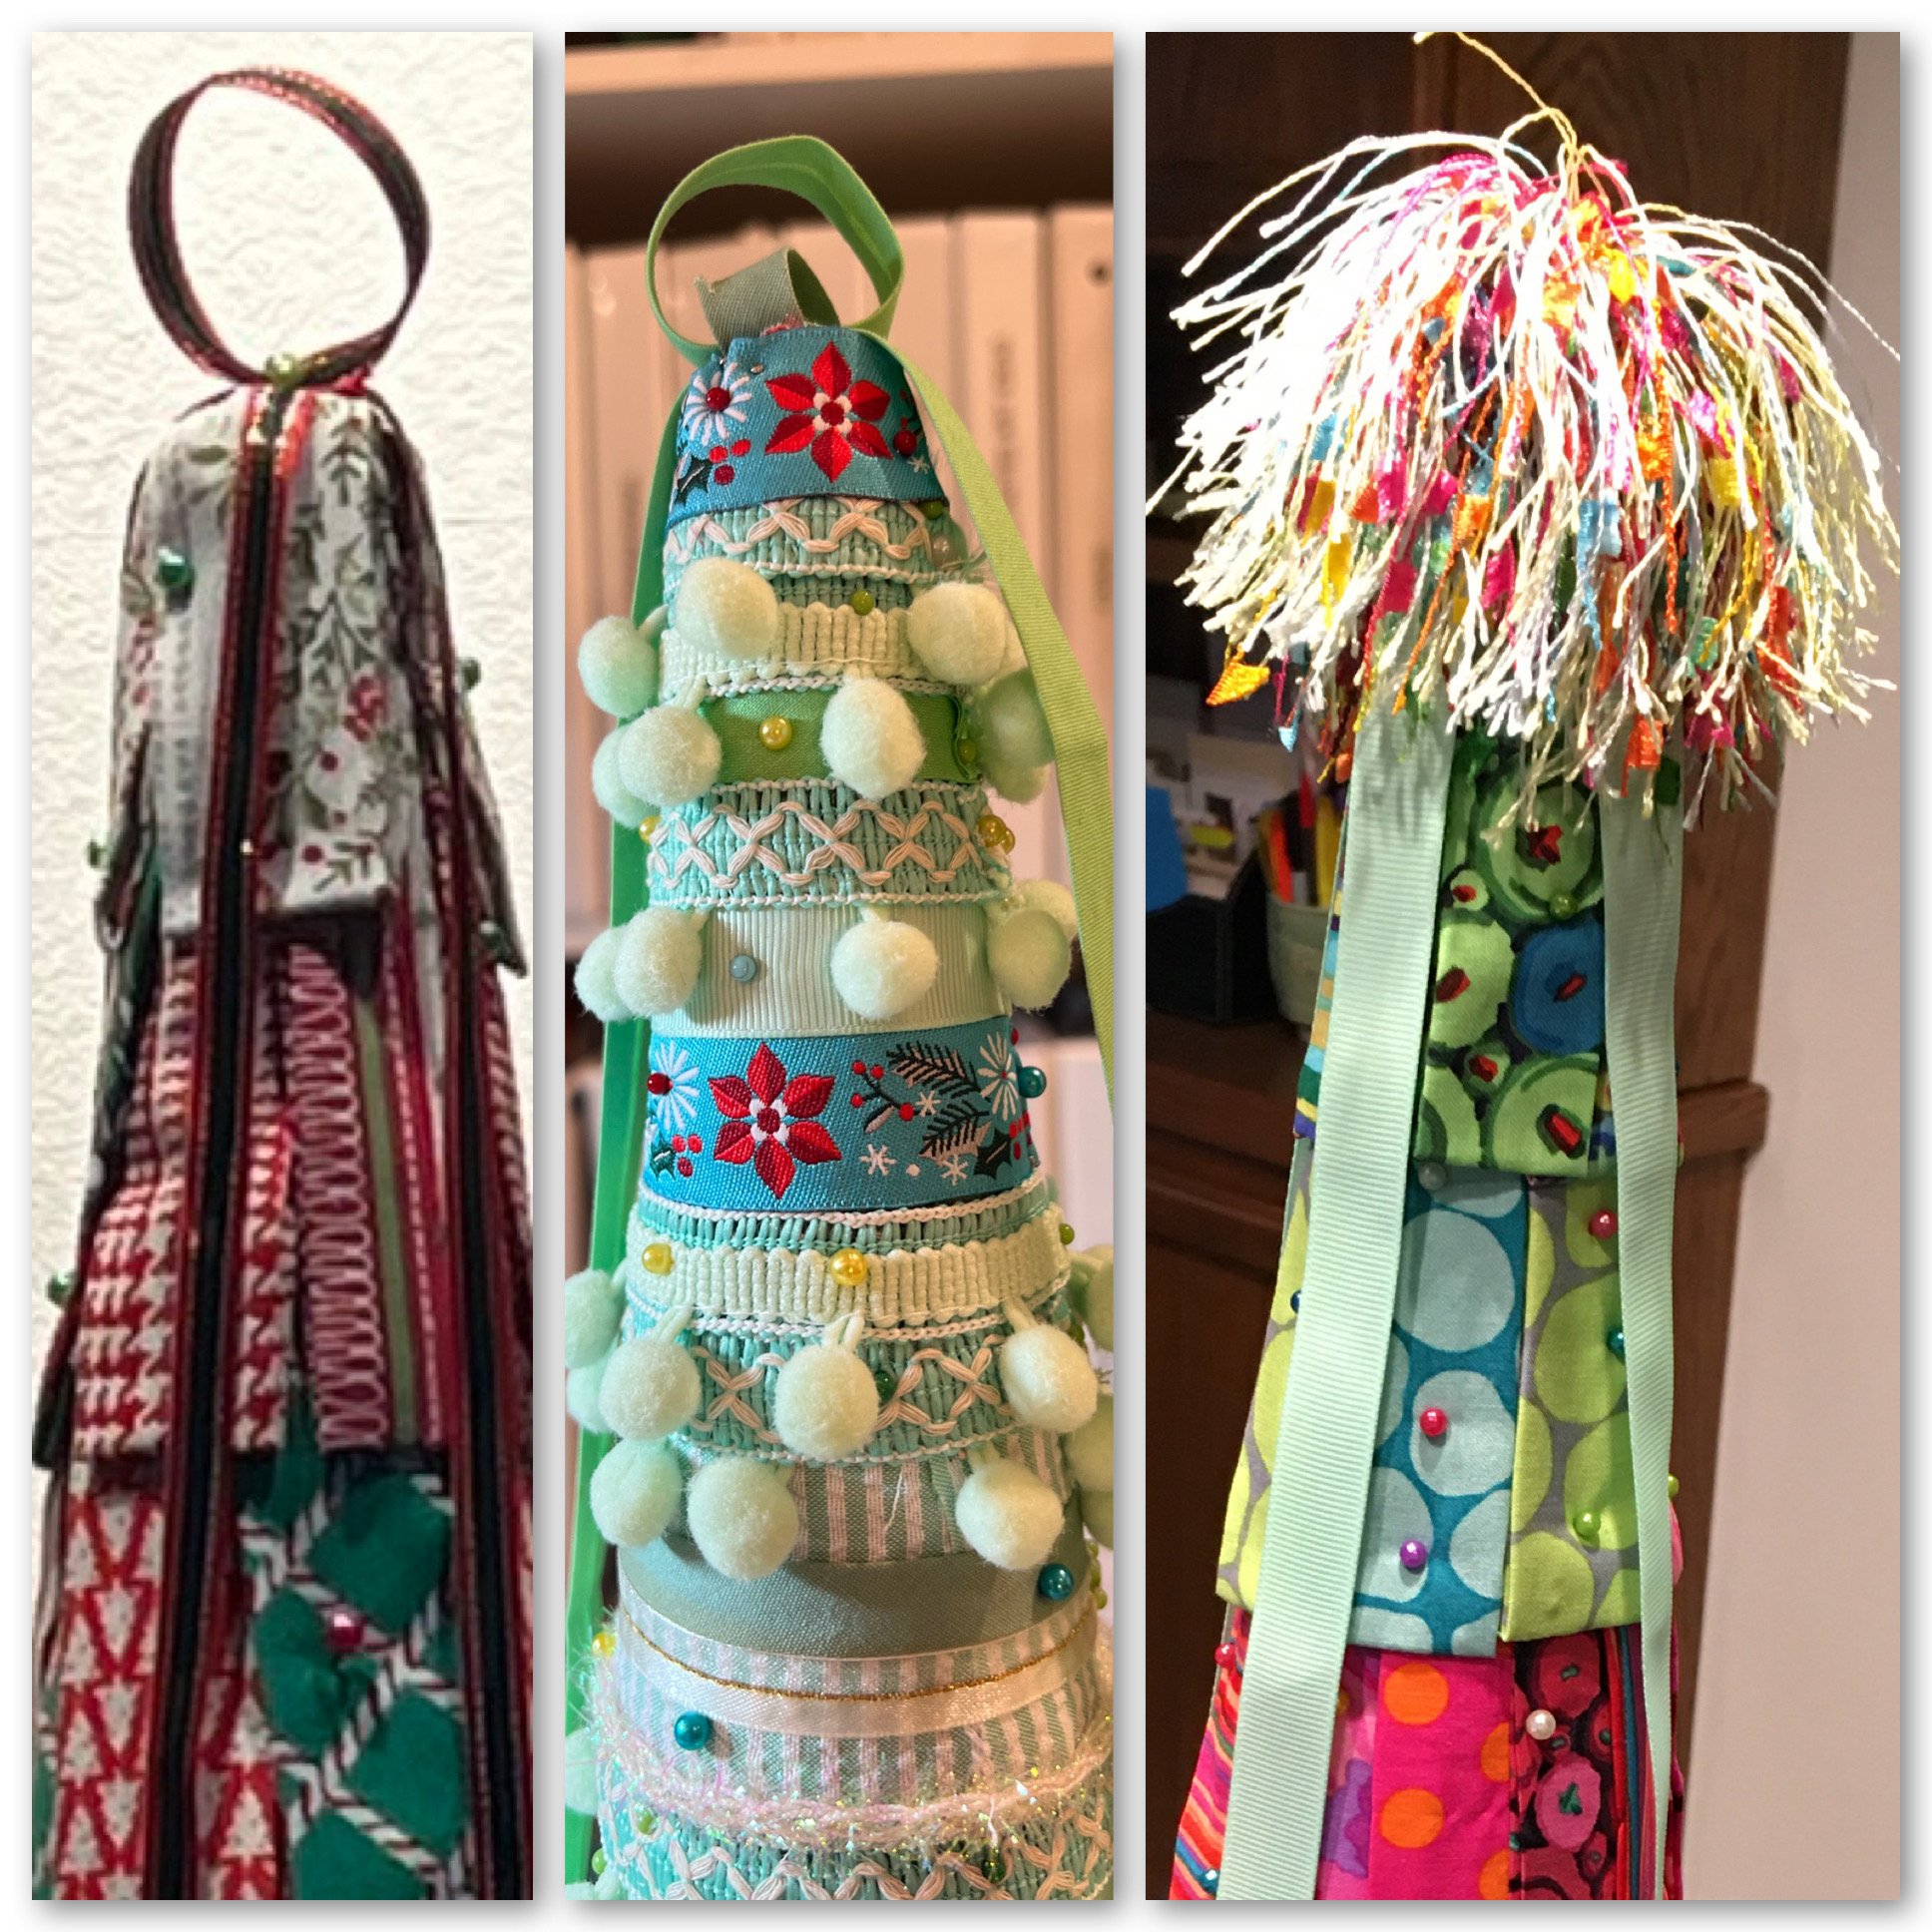
Not having been able to go out and shop for items like wood stars as a tree topper, I use thin ribbon as streamers pinned to the top of the tree cascading down and various tree toppers of ribbon or fringe. Some look like they are sprouting hair! As another option, sometimes I make a simple loop (or two) out of ribbon.
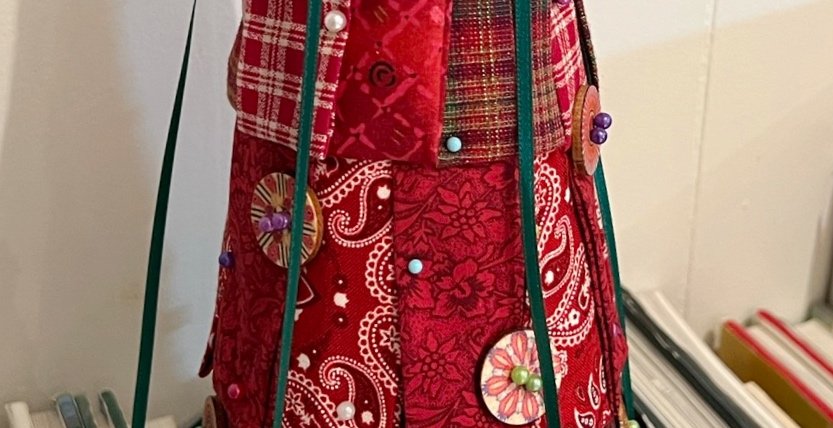
The final touch is adding pearlized quilting pins randomly placed to look like Christmas ornaments.

Then I wondered if I could make flaps from wallpaper? I had pulled out celadon wallpapers from the many sampler books I have accumulated and yes you can use paper to make the flaps. But it is far harder to get the rows to line up, and took a lot longer to assemble than the fabric trees did.

My printmaking professor and dear friend introduced me to Kaffe Fassett fabrics. Fassett is an artist in the UK. His saturated colored fabrics are addictive. They are my favorite trees and mine are still out on my table in March and may never be put away. I feel joy when I look at them.


After having made quite a few traditional colored trees, I wanted to mix things up a bit and ordered fabric online in light aqua, pale blues, light reds and corals. I found a mint green ribbon and used decorative rhinestones hot glued to the center of the ribbon as steamers. The topper is just a 3” (7cm) piece of ribbon pinned at both ends to the top of tree. The second ribbon fits inside and is a bit shorter. This creativity was simply the side effect of a lack of materials and improvising. I call these my beachy Caribbean trees.

Instead of cutting multiple “shingles” of fabric, for this version, I used pom-pom trim and assorted ribbons, pinned into place with straight pins.
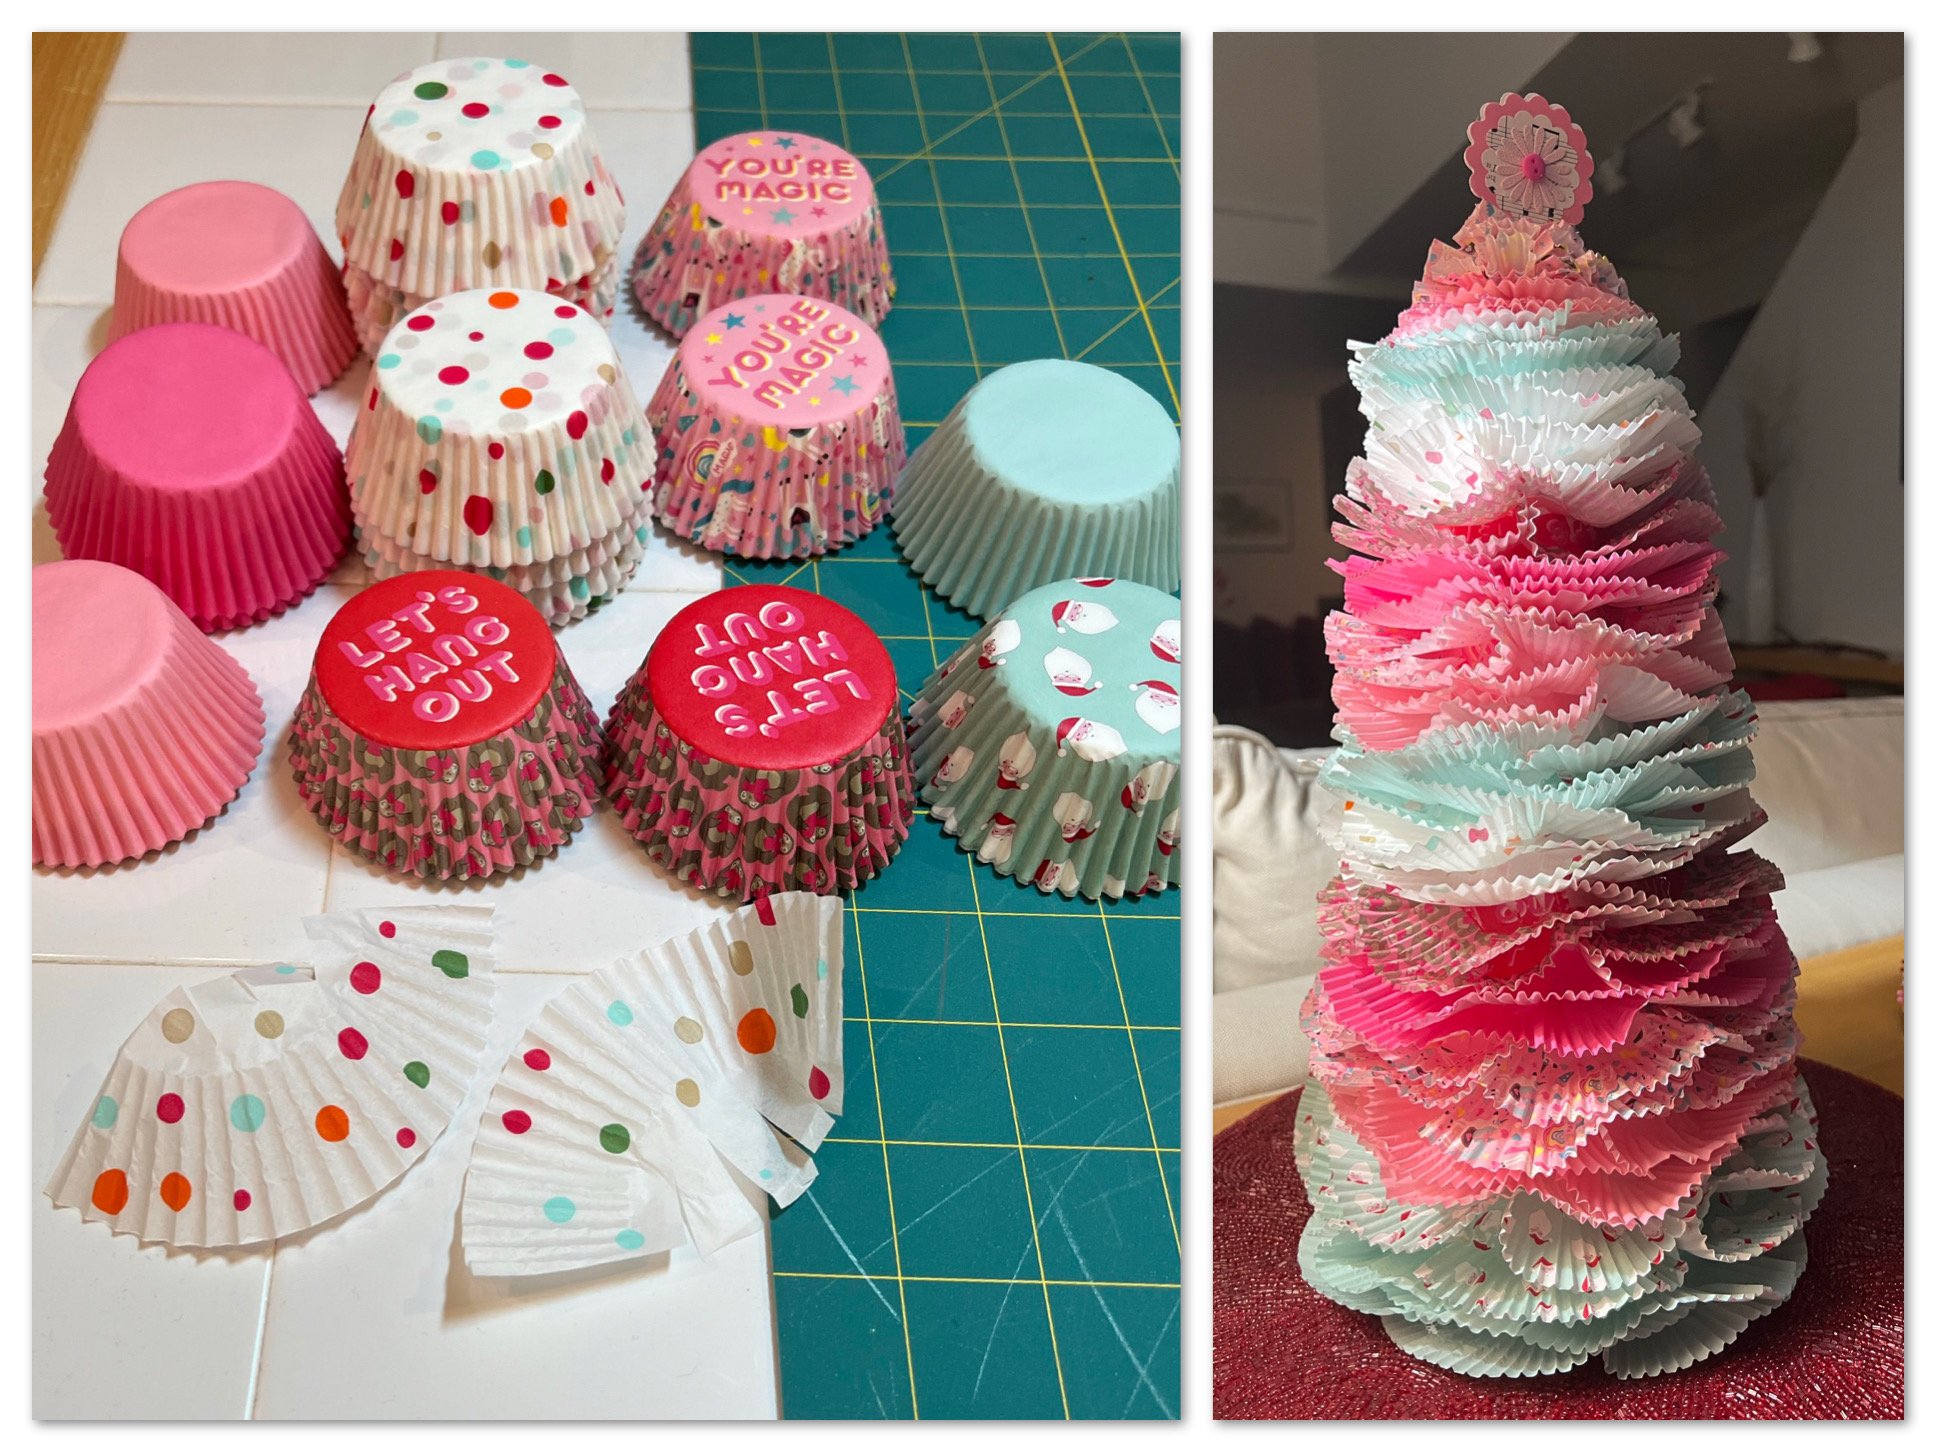
Also, I tried one that used cupcake papers, and I had them on hand, so I made one, but Lordy was it tedious and I really don’t love working with a glue gun so that one won’t get repeated likely. If you try it, I suggest using silicone thimbles that help from burning your fingers on the glue as you press the thin paper into place. Cut the muffin paper in half and then cut three or four little slits in the straight cut side which helps them lay flat. Brick lay pattern them. I did two rows of one color then changed colors. And I used a cardboard papier-mâché tree form.
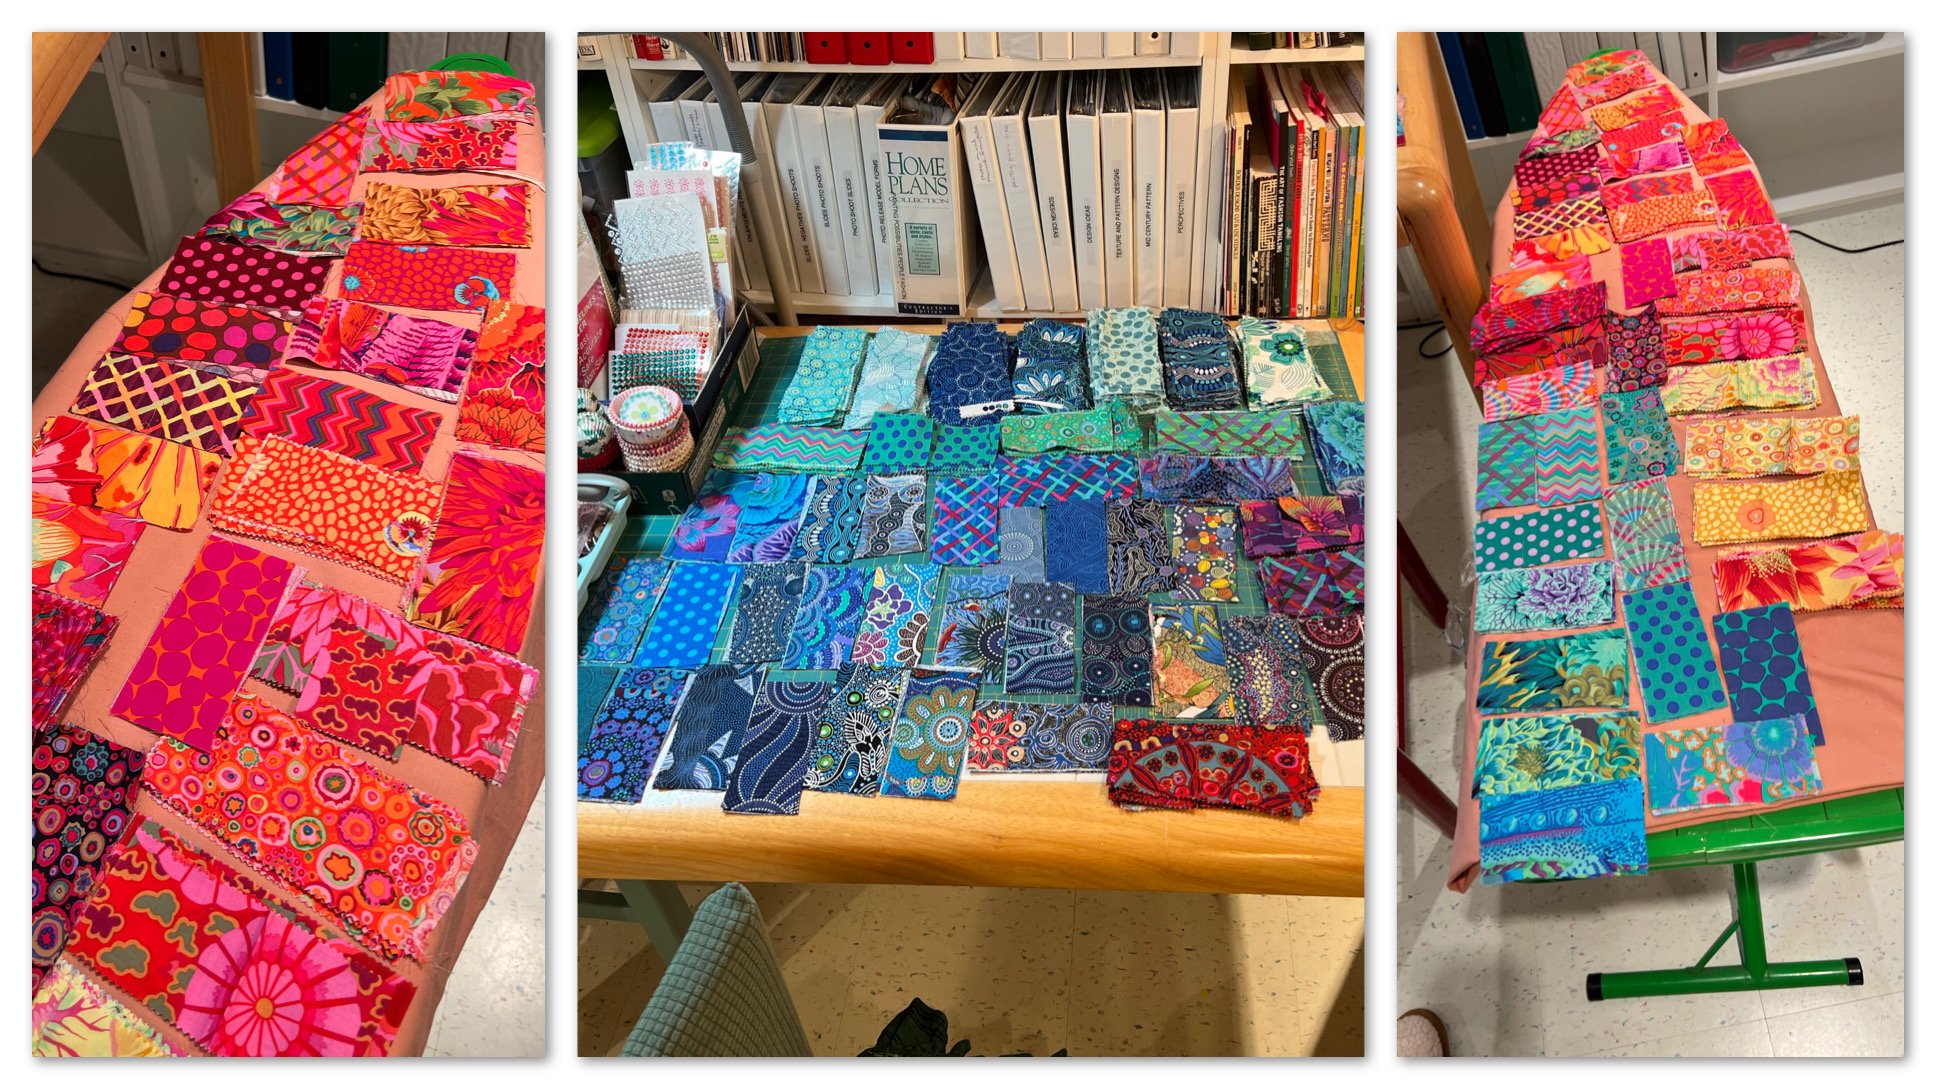
Here’s an example of how I prep my fabric, sorting everything by color. Once I started making trees for anytime of the year, it opened up my choices!

I ordered indigo navy, blues and white fabrics and made a tree in memory of my Aunnie who loved these colors best.

As I was ordering indigo fabrics, other materials came up and I found wooden buttons. I had gone down the rabbit hole on Pinterest looking at what kinds of trees other people were making (search ‘handmade Christmas trees’ and there are millions on there!) Of course I had to make a button one. I think this tree got the most raves, actually, so I plan on making more in the future. To begin with, I covered the Styrofoam with a dark teal fabric (secured with straight pins) and simply pinned the buttons to the tree using their holes. Very easy.

I saw a tree on Pinterest that used fabrics cut in concentric circles—edges left raw—and layered to make a flower. I ordered an artist’s paper flowers and did a tree that I really like with them that mimics that look. You can make them yourself with a die-cut machine or by cutting out fabric flowers, which I intend to do in the future. You can also sit your tree on a base. I have used a ceramic bowl that has a lid but I have seen them done on antique candlestick holders.
The second tree is one I made for a friend who loves owls.

I love these trees so much! This first photo shows a grouping in my home from back in December 2021 and the second with some of the same trees, even though this photo was taken in March 2022!
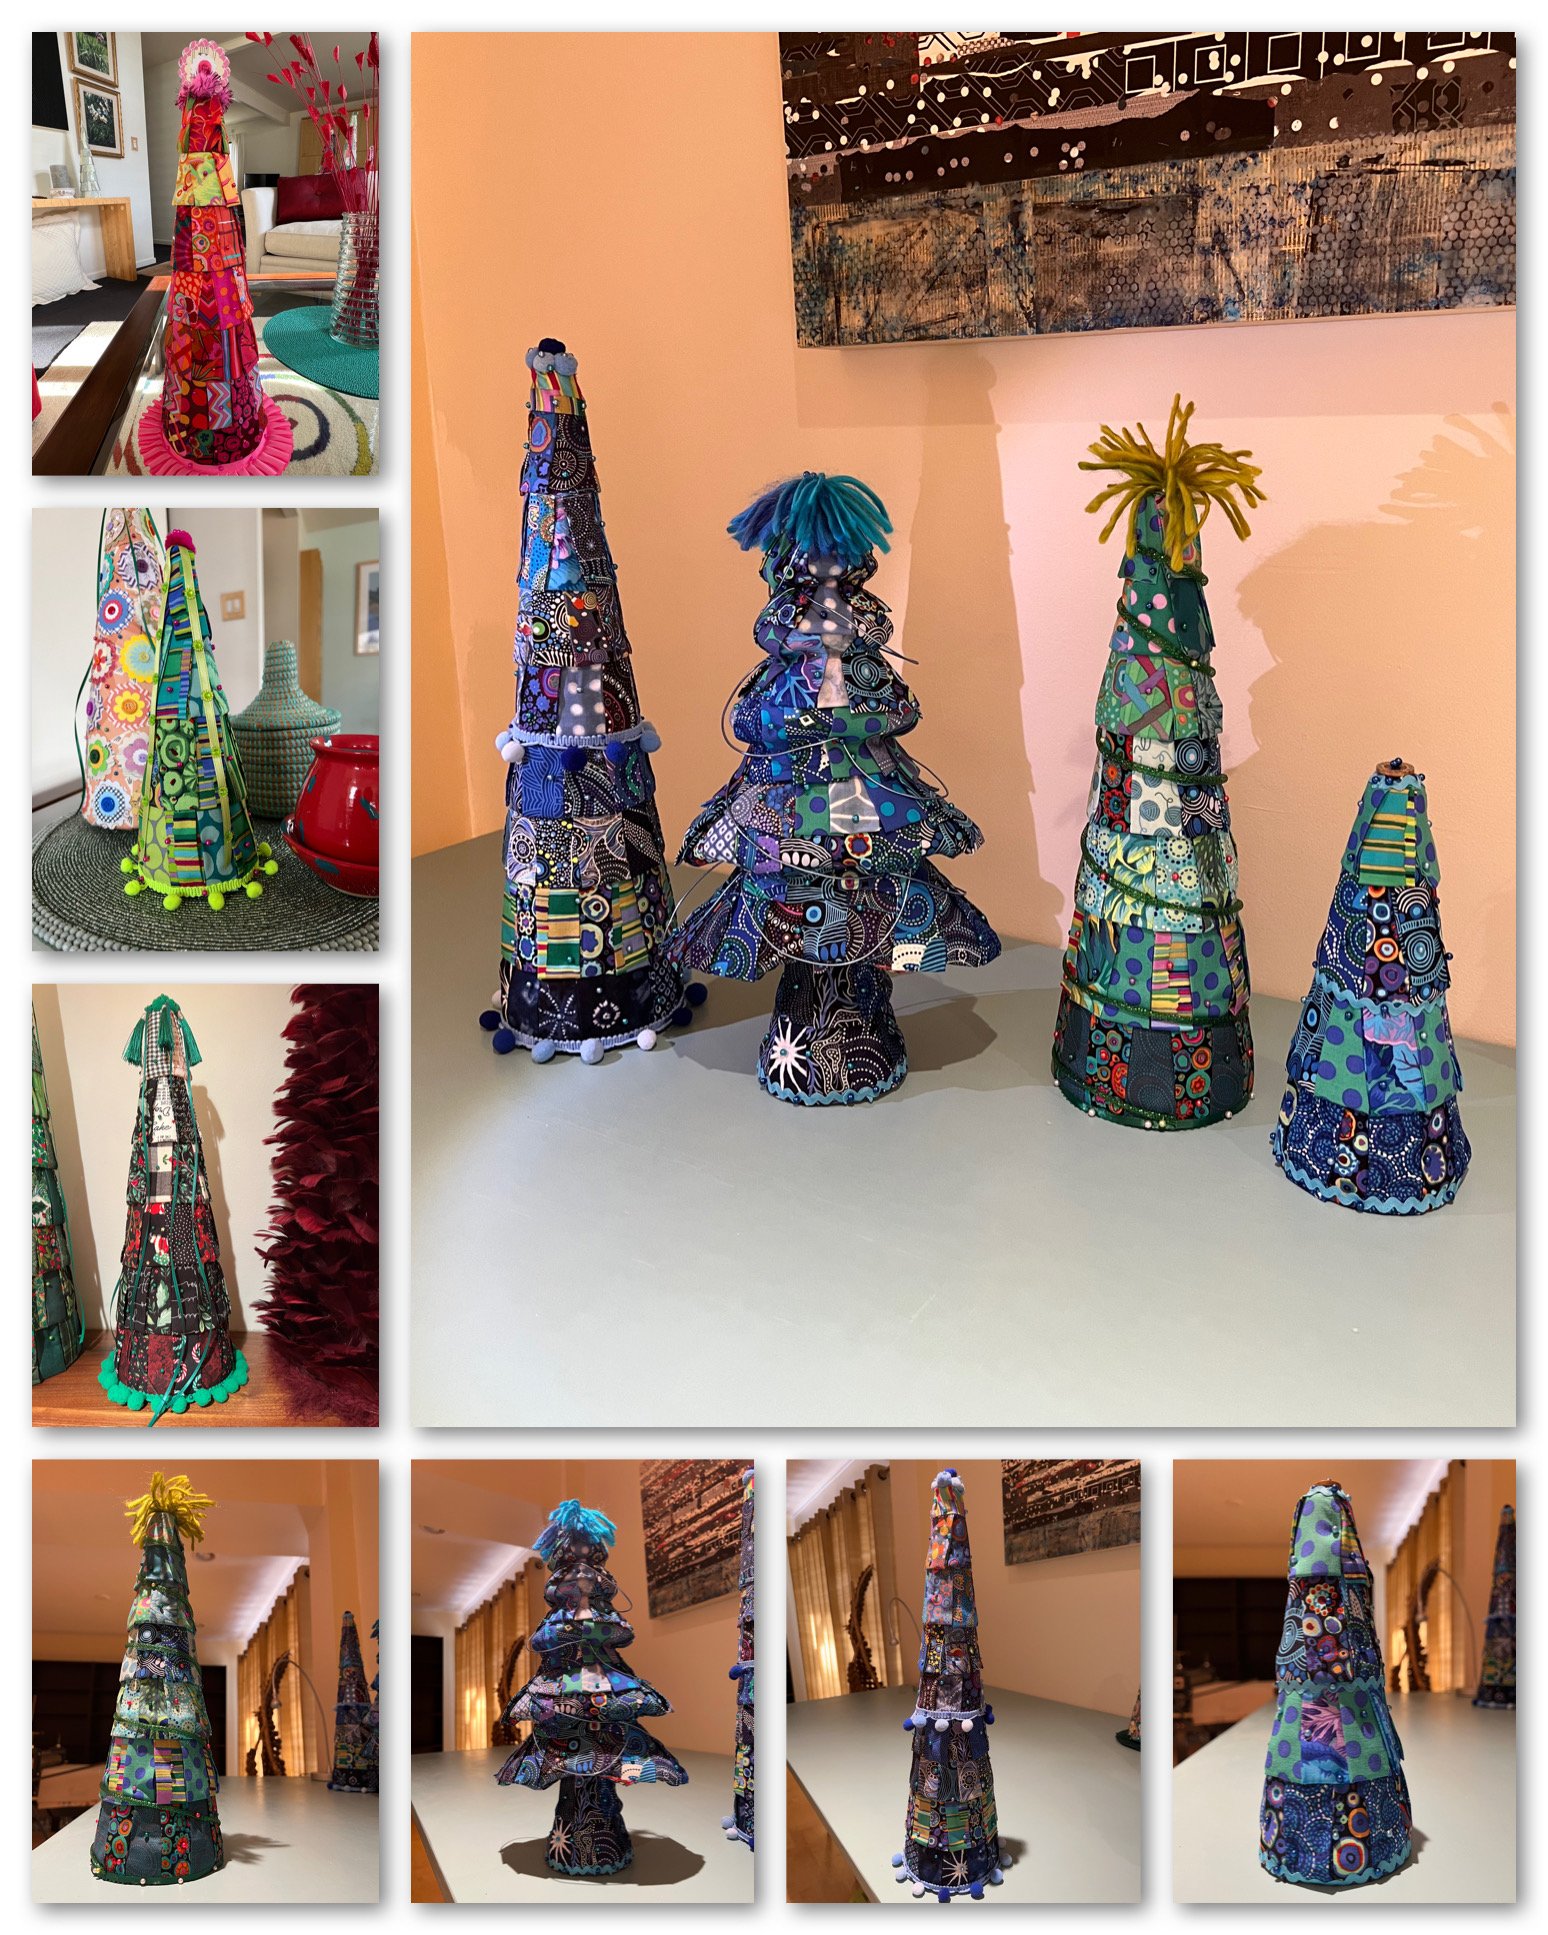
All good artists take an idea and push it to its limits before they move on to the next thing. I am still learning what is possible so I will be making trees for quite a while I think. I enjoy giving them as gifts. They look good together in groups of threes; a tall one, medium, one and short one. These are some of my most recently created trees.
People have told me I should sell them. The problem/question is for how much? It takes about two days to make a medium to tall tree. The fabrics vary in price and the Kaffe Fassett fabrics are in the high price range so difficult to figure out the cost of a tree. But I am going to put some on my website soon for sale. The range will be $25 for a 6” (15cm) tree, $45 for a 12” (30cm) tree, $70 for a 16” (41cm) tree, $90 for 48cm) tree and $125 for a 24” (61cm) tree. You can get in touch with me on Facebook private messenger or here on my website.
Or you could have the fun and satisfaction of making your own tree! Please share in the comments if you do, I’d love to hear about it.